Creating rectangular buffers in ArcGIS Pro can be useful for a variety of applications, such as visualizing the area around a specific point or selecting features within a defined distance. While the Buffer tool in ArcGIS Pro does not have the option to create rectangular buffers directly, there is a workaround that you can use to achieve this result. In this blog post, we will walk through the steps for creating rectangular buffers in ArcGIS Pro using a combination of the Calculate Geometry Attributes tool, the Table To-Ellipse tool, and the Minimum Bounding Geometry tool. Whether you are a beginner or an experienced GIS user, this tutorial will provide you with the skills you need to create rectangular buffers in ArcGIS Pro.
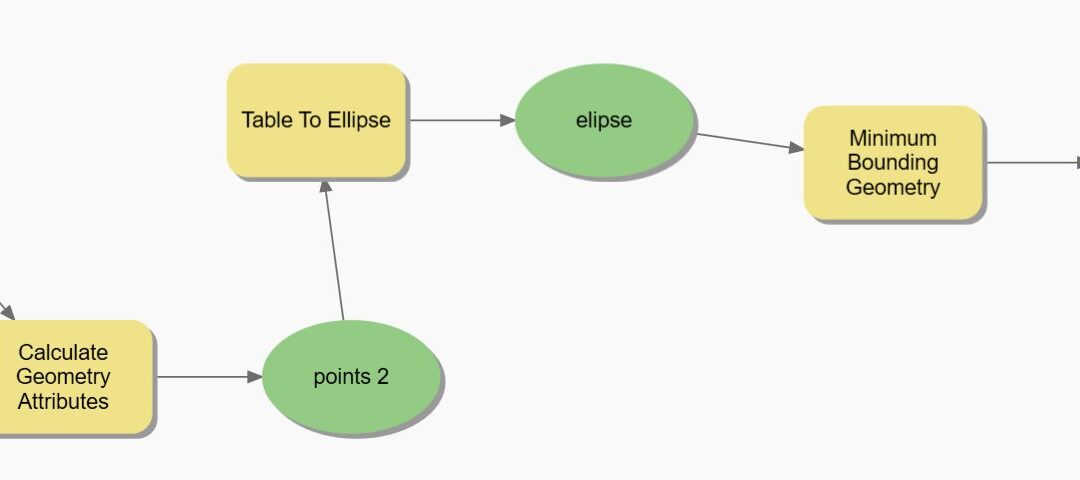
If you need to create a rectangular buffer in ArcGIS Pro that is centered on a specific point, there is a workaround that you can use to achieve this result. In this tutorial, we will use a combination of the Calculate Geometry Attributes tool, the Table To Ellipse tool, and the Minimum Bounding Geometry tool to create rectangular buffers that have their centroid on a point.
- Add your point data to the map in ArcGIS Pro.
- Select “Calculate Field” and calculate two new fields. One for “length” and one for “width”. Place the length and width that you desire in the the field.
- Use the Calculate Geometry Attributes tool to calculate the x and y coordinates of the points. To do this:
- On the Analysis tab, in the Geoprocessing group, click the Calculate Geometry Attributes tool.
- In the Calculate Geometry Attributes dialog box set the following parameters:
- Input Table: Your point data layer
- Output Table: Provide a name and location for the output table
- Calculate Area: Uncheck this box
- Calculate Length: Uncheck this box
- Calculate Geometry: Check this box
- Geometry Property: Select “X Coordinate of Point” and “Y Coordinate of Point”
- Click OK to run the tool.
- Repeat this process to calculate the y coordinate of the points.
- Use the Table To Ellipse tool to create ellipses from the x and y coordinates of the points. To do this:
- On the Analysis tab, in the Geoprocessing group, click the Table To Ellipse tool.
- In the Table To Ellipse dialog box, set the following parameters:
- Input Table: Your table with the x and y coordinates of the points
- Output Feature Class: Provide a name and location for the output feature class
- X Field: Select the field containing the x coordinates
- Y Field: Select the field containing the y coordinates
- Major Axis Field: Your Length Field
- Minor Axis Field: Your Width Field
- Click OK to run the tool.
- Use the Minimum Bounding Geometry tool to create a rectangular buffer from the ellipse. To do this:
- On the Analysis tab, in the Geoprocessing group, click the Minimum Bounding Geometry tool.
- In the Minimum Bounding Geometry dialog box, set the following parameters:
- Input Features: Your ellipse feature class
- Output Feature Class: Provide a name and location for the output feature class
- Group Field: Leave this blank
- Type: Select “RECTANGLE_BY_WIDTH”
- Minimum Bounding Rectangle Field: Enter the width of your desired buffer in map units (for example, 4 feet)
- Click OK to run the tool.
This will create a new feature class with rectangular buffer features centered on each of the input points. The width and length of the buffers will correspond to the dimensions you specified, with the centroid of the rectangle located at the input point. You can then use this feature class as you see fit, such as to visualize the area around each point or to select features within the buffer.
I hope this tutorial has been helpful for learning how to create rectangular buffers in ArcGIS Pro. Whether you are working on a personal project or a professional assignment, being able to create rectangular buffers can be a valuable skill to have in your GIS toolkit. If you have any questions or need additional help with this technique, don’t hesitate to reach out to our team at Tabulae Spatial. We offer consulting services and can provide customized support to help you get the most out of ArcGIS Pro. Thanks for reading, and we hope to hear from you soon!